Open topic with navigation
Adding a User
You can add users to your account and grant them access
to a subset of Account Management functions, including granting access to functions for one or more sub accounts. You cannot grant access to
Funding functions to a new user.
To add a user to the account
- Click Manage Clients > Users.
- Use the Account Selector
to search for a client account by Account ID, Account Title
or Account Alias, then click the desired account.

The Account Selector is closed once you select an account. To change the selected account, click the tab to open the Account Selector, and then click a different account.
The Users page opens.
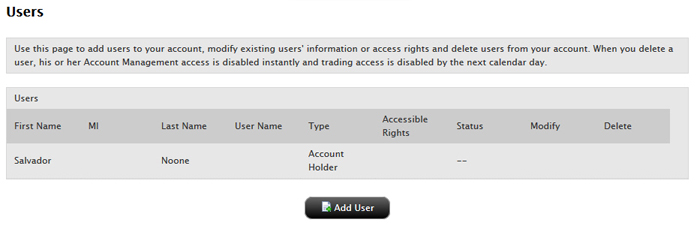
- Click Add
User.
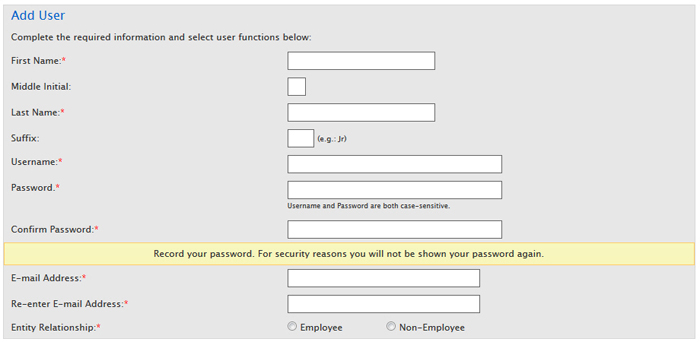
- On the Add User
page, enter all required information, including name, six-character
username prefix, password, and email address.
- On the same page, assign Account Management
functions to the user by clicking the appropriate check boxes in the
Access Rights section. Access groups correspond to Account Management menus.
- If you have created any User Roles, optionally select a User Role. The access rights saved with the User Role will be applied to the new user.
- Click an access group to expand the section, then click check boxes to grant access to individual functions.
- To grant access to all functions within an access group, click the check box next to the access group name. If a function is not checked, the user will not
be able to access the function in Account Management:
- If you are adding a user to a multiple account structure, when you click a check box for an Access group or for an individual function inside an Access group, the Assign Accounts box opens.
Use the Assign Accounts box to select which accounts you want this user to be able to access for the selected function or group of functions. You can select:
- All for all accounts, including the Master and all sub accounts;
- Master to grant access to only the Master account;
- Sub All to grant access to all sub accounts;
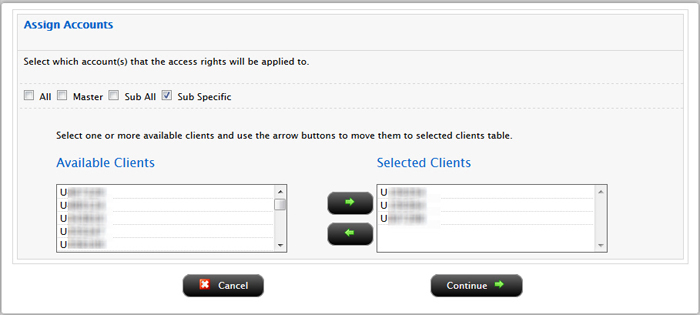
- Sub Specific, to grant access to individual sub accounts. .
If you select this option, two lists of client accounts - Available and Selected - appears. To select individual client accounts, highlight them in the Available Accounts box and click the right arrow button to move them into the Selected Clients box. Remove client accounts from the Selected Accounts box by highlighting them then clicking the left arrow button.
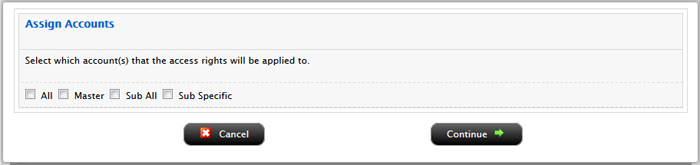
Click Continue to save your account assignments.
All account users automatically get rights to Security functions (Password, Secure Login System Secure Device Sharing, and Voting Subscriptions), which are located in the Manage Account > Security access group, and the functions in the Manage Account > Settings access group (User Information and Email Address).
The following figure shows an example of an access rights configuration. In this example, a user is being granted access to all functions in the Reports > Activity menu of Account Management.

- On the same page, you can select the accounts to which the access rights are assigned.
- Highlight one or more individual sub/client
accounts in the list (Ctrl+ click to select multiple non-adjacent
accounts in the list; Shift+click to select multiple adjacent
accounts in the list). Click the All
Sub/Client Accounts check box to select ALL accounts.
- Click Continue.
- Verify that all the information is
correct, then click Continue.
If you need to make further changes, click Back,
then make corrections before submitting.
- Enter the confirmation number sent
to you via email, then click Continue.
If you have not received a confirmation number, click Request
Confirmation Number to have
a confirmation number sent to your email address on record.
- Click Cancel
to cancel your changes.
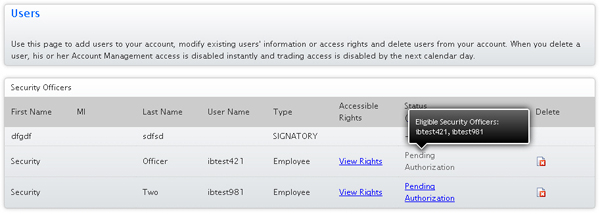
Viewing Pending User Access Rights
Click Pending Authorization in the Status column for any Security Officer listed to view a popup that displays the pending user access rights.
Viewing Eligible Security Officers on Pending Items
On the Users page, you can move your mouse over the Status of any Security Officer listed with a status of Pending Authorization to see a popup with Eligible Security Officers displayed:
You can view your pending changes to user access rights on the Home > Pending Items page. Move your mouse over those pending items to see a popup with Eligible Security Officers displayed:
